Showing posts with label Bike projects. Show all posts

Tuesday, May 15, 2012

Merrily we roll along

Had a great time at the Cyclofemme ride on Sunday, was great to see some familiar faces, and meet the organizers of the Boston Bicycle Belles.

Yakkay Helmet- and it matches her ensemble perfectly!


Gold and White 
A specially built pedal for riding while the owner's foot was in a cast 


Po Campo trunk bag

And Po-Campo panniers
And More Po Campo bags!
 Had to turn around in the Fenway rest stop and head home though because I was trying to replace my instant hot water heater that I rely on for coffee making every morning.

  When my new-ish hot water heater died after about a year's use, my Dad and I thought we'd pull a fast one by installing another one by the same manufacturer that my Dad happened to have lying around (long story).  However the installation is a tiny bit different, and I can't seem to get it installed without leaking.   GRRR.  I was so sore on Monday- my quads and hip flexors were complaining about all the contortion under the sink.

Because I "sunk" so much time into that, there wasn't much left for other things on my "To Do" list, although I did manage to get Gilbert's rear wheel reinstalled (FINALLY)  while watching Sherlock.
It's handy to have the bike repair stand set up in the TV room!   I've become crazy addicted to Sherlock, to the point where I'm considering buying the DVDs so that I can see the 8 minutes they cut for "messages from our sponsors."  If more TV was like this, I'd watch TV, so it's probably a good thing because I really don't have time to watch more TV.

I've still been riding Minerva this week though,  because I haven't had the time or energy to do a shakedown ride on Gilbert.  I'd rather find out that I didn't properly adjust the brakes while riding around the block than halfway to work.  We also have an "interloper" in the bike shed, and I'm not wanting to figure out how to fit a 6th bike in there.  


 The Scientist's citified mountain bike has been lurking at his office for months, the tires slowly deflating.   I wanted to fix it up so that he had an alternative to his road bike for riding around our neighborhood,  but how to get it home?   This bike is a 22" frame, which is actually a bit small for him (6'5").   I ended up at his office on Saturday morning, and needed to get home, so I pumped up the tires, which seem to hold air just fine (knock on wood)  and then I pushed the seat all the way down, did a quick ride around the loading dock to make sure I could dismount without hurting myself ( I can just barely straddle the top tube without damaging myself.   Of course, I was wearing a skirt, but by tipping the bike sideways, I could mount reasonably demurely, and managed to ride, slowly and cautiously the 2 miles or less home.
Simulated panda shot on giant bike- have to really stretch

Now that we have it, I'm soooo wanting to give it a makeover to make it look more like a proper city bike (I'm thinking hammered fenders and  flipped albatross bars.)  But I'm not sure it's really that kind of bike, and I don't want to spend too much time and money on it, seeing as he really needs a larger frame.  I keep trying to talk him into a Surly LHT now that they're making a 64" frame,  but he's not really interested in that either.

I did drop by the Broadway Bicycle School Pancake breakfast this morning, but took no pictures because I forgot both camera and phone!   I saw a couple of familiar faces, and got a chance to briefly talk to a couple of new people before I dashed, off to work.   They had a barista from dwell time making pour-over coffees, but I didn't have time to wait in line, unfortunately.  The pancakes were sure good though, and I'll try to get there earlier next year so I have more chance to chat with people.


Wednesday, April 18, 2012

Tough slog in

For the first time in so-long-I-don't-remember-when-it-happened-last, I got a flat on my way to work yesterday morning.   It was a slow one, and I managed to make it to the Scientist's office before I had to ditch and take the T.
It's hard to tell it's flat, but put any weight on it and it smushes down completely.
 Of course it's a rear wheel, which is absolutely no fun to deal with  :(  Good thing I have Minerva to ride the rest of the week.  Maybe I'll try to patch it the sneaky- wheel still on the bike way.

To add insult to injury the one Hubway left in the rack at DTX wasn't working (someone had just grabbed the other one), so I had to walk from the T to work.

Just one of those mornings.   At least it was a gorgeous morning- low 70's and sunny.  I wish I'd had my camera to grab some street shots of all the bikers who didn't get flats this morning:   including a stately older gentleman in a natty hat who was taking his bike off the bus rack, a woman in a hot pink pencil skirt with legs pumping- in a hurry to get somewhere,  and a bunch of regular everyday riders in business clothes.

In the evening I rode a hubway from the financial district to Charles MGH.   Merging through that nasty traffic circle was not made any easier by riding an enormous and slow to accelerate Hubway, but I made it fine by being assertive, and then becoming a pedestrian.   Then I walked across the river to MIT where I put Gilbert in the basement of the Scientist's building and hitched a ride home with him.

Wednesday, April 11, 2012

The Bike Coffee Cup Hunt

I have been trying to find a really spill-proof coffee mug for use in my relatively new bar-mount coffee holder.   The problem I've had with my regular coffee mug, is that even if you don't really drink from it en-route, a few drops can leak through the seal, and then they fly up onto your clothing when you hit a bump. Blech!
My home"brew" solution, which works, but is not exactly elegant.

I had high hopes for this bottle from Thermos, because it has a lid that completely covers the drinking hole. Unfortunately it's too narrow for the bike holder, and slips through the ring! I tried another Thermos brand mug, and it leaked the first time I hit a bump,  and I had to dig the plastic bag I keep under my saddle as a rain cover out to keep it from splattering on me the whole ride.

I finally managed to find the OXO good grips that Portland Design Works (the company that made the holder) recommends for use in the "bar-ista".   My search was complicated by the fact that Target, where I had been looking has some insulated liquid carrying devices in the sports area (think "hydration")  some in the automotive section, and still others in the kitchenware area.   So far so good on the maiden voyage-  no leaks and no spills and it fits snugly in the holder.  I probably wouldn't go to all this trouble, except for I'm trying to reduce my caffeine intake, and the office only has caffeinated coffee.  It will be also nice if I ever make a stop at the new Dwell Time coffee shop on my way in (just a short detour) to get a treat like a latte'.

Do you ride with a cup of coffee onboard?  Is it part of your daily routine? What's your system for portage?

Wednesday, January 11, 2012

Gilbert rides again

As reader Old Knotty Buoy's sharp eyes noticed,  after a lengthy hiatus,  I'm riding Gilbert again! He had a collection of minor ailments, none of which were truly serious, but during the holidays, I just didn't have time to mess with them.   Over New Year's weekend, I hoisted him up on the stand, and set to work.

First:  new tires. The old tires, after 18 months and about 4,000 miles were showing some cracking in the sidewalls.  I don't really know if that's "good" or not,  and I could have continued to ride them, but they made me a bit nervous, so I decided to switch them out with identical Schwalbe Delta Cruisers in cream with reflective side bands.   Removing the rear wheel is always a bit of an ordeal on an IGH/ hub brake bike,  so I don't want to do it often,  but it went reasonably smoothly.   For some reason I find removing and re-seating tires on rims to be really hard-  does it really have to be that hard?  Isn't there a better solution?  Like expandable/ contractable rims? or shrink to fit beads,  or something?  Anything?  I would say that my hands just aren't big or strong enough, but I called in reinforcements, and the Scientist was struggling too.  And I'm not sure if Archimedes was right- I'm not sure that longer levers, or a better place "to stand"  would have solved the problem.

While I had the wheels off,  I did some messing with other things- cleaned and waxed the inside of the fenders,  and removed the rear tail light.
The tail light is held to the fender with a bolt whose square head is captured in a notch in the plastic housing.  Unfortunately the plastic cracked, and the head was rotating, loosening the tail light so it wobbled a bit,  and making it impossible to either tighten or remove.  I ended up taking it apart from the outside,  using my brand new from Christmas impact driver to coax out one semi- stripped screw.   I replaced it with a normal hex head bolt, ignoring the plastic slots.  To remove it, I'll have to take it apart from the outside again, but I'm OK with that,  and hope not to remove it for a good long time.

I  also did a bit of messing with his rear rack.  The rack is a NOS Steco, designed to be mounted to the seat stays with clamps instead of to the axle bolt.  I didn't like how that looked, so I replaced the legs with a pair of sawn off struts from a "sissy bar" seat.  I used the existing crimped places in the struts as locations for the holes,  and it never was quite level.  The rack was held "up" by a little metal strap, attached to the brake bridge.  Either the strap was too short or the struts are too long.  It will be a complicated project to shorten the struts, so I tried replacing the strap, with a slightly longer "mending plate".  It's better,  but it's still not dead flat level.

I also had more struggles with the pie plate.  Something- either the chaincase, or the pieplate, or both got tweaked, and although I could press fit the pieplate into the chaincase, using a bunch of clamps spaced around the edge, as soon as I removed a clamp, it would pop out again.  I spent a lot of time thinking about options for brackets, magnets, shims,  maybe even caulk,  and decided finally that I needed a removable adhesive- something that was flexible and sticky, but that wouldn't prevent me from taking the plate off, and wouldn't leave a residue on the bike.  I was very hopeful about "fugitive glue"  aka credit card glue, aka "gorilla snot"- the stuff that holds credit cards to mailers.  You can buy dots of this glue at art supply stores, and it held for about 24 hours, but on the first ride, it came off.  I have so far had more success with removable 3M adhesive foam squares.  You can sort of see them around the edge, so it's not super elegant, but it's working for now.

The final projects were pedal and kickstand.   I must be pedal-challenged, because on my first ride after the saga of the left pedal, I was about halfway home when I realized that my right pedal was loosey-goosey.  I must not have properly tightened it, and had in the process of riding to work and back, managed to strip the threads on the crank and the pedal- not completely, but enough that they didn't thread smoothly.

I do think that long term I will replace the BB on Gilbert with a Phil Wood, and convert him to cotterless cranks.  However, for now,  and since I'd just wrecked the thread on a brand new pedal, and a crank,  I decided to take the semi- drastic step of red- loctite-ing the pedal into the crank.  Basically, if the pedal lights fail,  that will be my cue to replace the whole shebang.  It just seemed wasteful to trash both the light and the crank.  I'll put in another plug for how much I like these pedalites, and how I think that the company is a really good one.  I know I've managed to wear out a couple of them,  but when I wrote them asking if they'd sell me just a couple of the gears that had stripped, instead, they sent me a free pair of pedals,  without asking.  I'll definitely put them to good use,  as I really think they're a great safety product- the strobes are super bright, and they don't have much impact on the overall appearance of the bike.

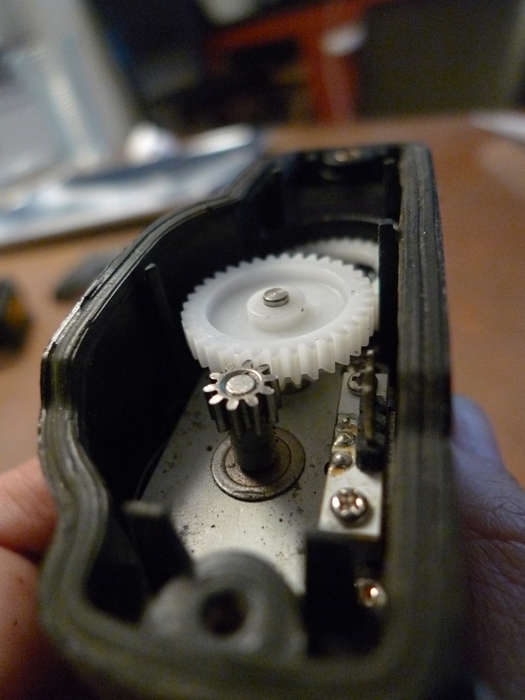
The kickstand was another issue.  When Harris replaced the left crank,  it was a milimeter closer to the BB.  And thus with every stroke I had a tic- tic- tic of the crank hitting the kickstand.  I could twist it out of the way,  but it would slowly twist back as I rode.   No matter how I'd tightened the bolt down I never really could get the body of the pletscher two legged stand to stay still where it was attached to the frame- I got really good at nudging it back with my heel,  but it was annoying.  So I decided to remove it but it was really dug in.  I put PB blaster on it and then tried again, this time with a cheater bar on my allen key..... and promptly rounded the allen key recess.  sigh.

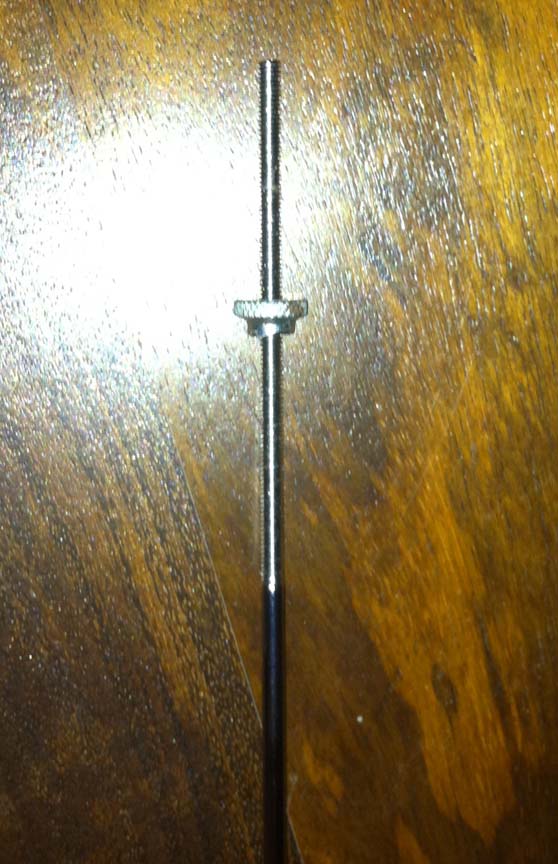
I attempted to epoxy a hex bolt on the top of the "screw"  but  it just sheared right off.  So I drilled it out,  which was a real PITA- not a lot of space to get the drill in between the fender, the chainstays and the seat tube.   Finally got the kickstand off the bike, but the kickstand body still had 2" of jagged edged bolt sticking out of it.  It turns out the bolt is steel, and the body is aluminum, and dissimilar metals like that will sometimes chemically bond, or "gall," especially in wet and salty areas. It's a common problem in marine applications and car water pumps, Google tells me.   In future,  install dissimilar metals with anti-seize compound (from the auto-parts store).  Anyway,  I tried heating it with a torch,  more and more PB blaster,  and some serious attempts with a vise, and a pair of vise grips- no luck.  Finally I gave up and ordered a new kickstand.

I knew I wanted a two footed one- it's just much more stable for the kind of loads I put on my bikes.  After my frustrations with adjusting the Pletschner, I decided to try the U-shaped type instead of the scissor type.  Hebie makes one called the bipod, which the internets say great things about.  But they don't have a US distributor,  and the only one I could find in the US was a "resin" model,  which I was a bit skeptical of.  Sunlight (the cheapo bike products company) makes one , but I didn't trust it at all.  I was contemplating ordering one from Europe, when I found what's listed as the "civia "  stand.  Civia doesn't list the stand at all on their website,  but a couple of people were selling it on Amazon,  for $40 cheaper than buying and importing a Hebie would be, so I took the chance.   It arrived today, and I installed it with rudimentary tools at my desk after work.  So far so good- although I need to give it a final adjustment and tighten it down more firmly. It appears solidly constructed,  doesn't seem too heavy,  and operates smoothly.


In the "down" position
in the "up" position

Seems like the perfect length- holds the front wheel 2-3"  off the ground
The final product of all this tinkering:

Shown with a temporary "greenfield" kickstand I had lying about


 As you can see in the "final" photos, I have a couple of other additions/ Christmas presents- a coffee mug holder and a new pair of saddlebag panniers- the roll up shoppers from Linus.  Reviews coming soon!

Sorry for the super lengthy post- you can understand why Gilbert was out of commission for over two months while I got everything sorted out!

Sunday, October 30, 2011

How the Pedals failed

One (hopefully) last data point on pedalpalooza.

I ordered a triangle head screwdriver online after striking out at Radio Shack,  and promptly took apart the dead pedals, and one live right pedal.

Removing the black end cap reveals a circuit board and LEDs, which lifts up off of a bayonet mount 

There are three gears.  The one with the visible screw head is the end of the drive shaft (pedal)  The large one in the foreground has two tiers,  one in back with 18 teeth, and one in the front with 35.  The smaller cog mates with the pedal spindle, and the larger one mates with the generator spindle (the metal one on the left), creating current.


Bayonet mount for the circuit board on the right

When I removed the intermediary gear on the two pedals which no longer work, it became obvious why they don't work anymore- a section of teeth on the smaller cog are sheared off.  

When I took apart the right pedal (which has never been installed)  the circuit board is handed, but the other parts are basically the same, just a mirror image.   I took the center gear out of the good pedal, and put it in the bad pedal and reassembled it and the generator and the  circuit board and LEDs are perfectly fine.

So,  if only I could get replacement gears I could at least fix the one bad pedal whose threading I didn't mangle.  A cursory search though shows that it's not that simple.  I could probably get them custom made, but finding one with exactly the right diameter and number of teeth on both the top and bottom, the right bore for the spindle and the right height "stock" would be a real challenge.  I found a very technical post on getting custom gears cut for repairing a iRobot Roomba, and it sounds like the tooling is pretty expensive ($300)  and only starts to make sense if you are making hundreds of them.

I may contact Pedalite and see if they would sell me replacement gears.  Their customer service has been really good,  so they might do it.  It means that I would have at least one more left pedal that would still be operational, and a right pedal that's never been installed,  and I could put both of them on another bike- which might be good if I start riding Minerva more.  It's also possible that if they have a lot of failures of this gear they could/ should consider making it out of metal instead of plastic.  It would probably cost a few cents more, but maybe they'd consider it in order to make a more durable long lasting product.

Friday, October 28, 2011

Awesome DIY gloves

This morning was the first really chilly ride of the fall- complete with thin crusts of ice on a couple of puddles, and a tiny bit of snow on a couple of cars.   I've been wearing gloves all week, but my leather and thinsulate gloves aren't going to cut it much longer- my fingers were pretty chilly today.

Looking for "urban cycling gloves"  I found these amazing gloves which light up in a chevron when you close your hand into a loose fist. Check out the video of her making a right turn!


I think I'm going to go order some LEDs and some conductive thread right now!

Monday, October 3, 2011

Ironic packaging and artisanal cotter pins

I bought a package of brake pads for Gilbert two weeks ago (haven't managed to put them on yet) and they were sitting at the table as we ate dinner.  The Scientist was remarking that he needed pads for his roadbike, and I was looking at the packaging, and remarking that it must be Amsterdam in the photo- Women in ordinary clothes on city bikes,  tons of bikes parked in the background,  no helmets.  Looking further I noticed something that I found fairly humorous, given that they're selling brake pads.  Can you spot what it is? *  Hint at bottom of post

I also received in the mail "Artisanal" cotter pins.   Gilbert's left (non drive side) crank seems to be bent just slightly.  It's enough that when I ride another bike I notice that the left pedal feels "weird" and when I switch back, Gilbert feels "weird" and it's murder on the light up pedals that I like so much.  It eats them up- I've replaced the left one three times now!  Anyone need a right side pedal that flashes? - I've got an extra!  I suppose I could make it a prize for whoever first guesses the irony in the photo.

Anyway, after looking locally for a replacement vintage crank, I bought a repro left hand crank online,  although it doesn't look like it's fantastic quality.   I've heard that the absolute best cotter pins to be had are from Bikesmith in MN.   He makes a famously helpful tool for removing stuck Raleigh bottom brackets as well as a nicely made hand cotter press for home mechanics.  So on a bit of a whim, I ordered what should be a lifetime supply (6) of grade A cotters.

These "artisanal" cotter pins are turned on a lathe instead of stamped,  and then he goes through and custom files the bevel to match the raleigh slope, "even the nuts are turned on a lathe"
Honestly I'm not sure I'll notice the difference, and I feel a bit sheepish in a boho bourgeois way for ordering bits of metal to pin the cranks to my bike that have a longer and more lovingly  described provenance than an item on a trendy restaurant menu.  On the other hand,  it's making a guy a living doing manufacturing in the USA,  and it will hopefully help everything go together smoothly and not wobble and destroy cranks or pedals.  Some people spend a lot of money on designer clothes or fancy cars,  I just spent twenty five bucks for cotter pins.  Silly I know, but less than a tank of gas.

*And now for the promised hint- look at the handlebars on the bike on the left.

Sunday, September 25, 2011

Fixing it so it brakes, part 2

Back in May, I posted about replacing Minerva's  brake shoes with the fabulous new Koolstop rod brake pads.  I thought I would have a quick follow up about the final tweaks to the conversion of the front brake to a hub brake system.

Alas,  technical difficulties and life got in the way.  The technical difficulty was that I took the wheel off to take it to be trued, and somehow lost one of the axle nuts in the process.  No big deal except this hub seems to have really weird and atypical threading.  Harris ordered me a new one,  but then that one didn't quite work either.

Backing up a step (or three):   I had the front wheel built, and the drum brake temporarily installed with a cable between the old rod brake stirrup and the drum brake arm.


This was OK,  except it was really hard to adjust- you had to tension the cable just to the point of activating the brake, and then screw it down, and you really needed three hands to do it right.  I was contemplating a turnbuckle,  when a reader offered me a N.O.S.  Rod- drum conversion kit that he had ordered for a project that ultimately he didn't complete.   I didn't realize at the time how rare these are, so I feel very fortunate to have "happened" on one.

It looks basically like this:


A replacement "stirrup"  which attaches onto the drive side fork with a pivot, and has a rod that heads down to the hub,  with a threaded end and a dongle which engages in the rod brake arm.
The only problem was that the angle of the fork made it such that when the reaction arm was clamped to the fork (using the part that was designed for that), the angle of the activation arm caused the rod to hit the axle.


Rotating the reaction arm clockwise allowed the rod to travel in a straight line without hitting the axle, but make attachment to the fork troublesome.


And in any case the fork blade was so close to the axle body, that it seemed that the rod was binding and not moving smoothly.   I added some washers between the axle and the fork, which solved that problem,  but the replacement nut wouldn't tighten down enough to hold the wheel in place.

Finally, I bit the bullet and drilled a hole though the reaction arm of the hub such that I could attach it to the fork at an angle that would allow the rod to just miss the axle.  This allowed me to use the piece that came with the hub for this purpose, although not exactly as it was designed.  The arm was supposed to fit in a little notch on the clamp,  but instead I used it as a glorified P clamp.  

All this was enough to get the brake working, and well enough (and easily adjusted enough) that after a quick spin around the block, I felt up to riding 14 miles (RT) to Harris Cyclery and back to pick up some brake pads.  I could have probably found them closer, but wanted to also stop by Russo's market.  The trip was uneventful (although I packed a lot of tools just in case),  but super sticky. 


I stopped briefly on a bridge over the Charles to enjoy the view.  It was so humid that you could see the air!   After a long hot day of errands and bike messing, I was glad to take a cool shower and relax in the AC.

I still haven't resolved the axle issues.  The good news is that I found the original axle nut  a couple of weeks ago between the seats of the Scientist's car,  the bad news is that I don't remember where I put it when I found it.   The wheel is being held in mostly by gravity,  which is not a good long term plan.  My hope is that I can find the correct nut,  screw everything down properly and have a roadster bike with its lovely slack geometry but with all weather reliability and lighting.  It's been a long slow road, but I think the end is in sight!

Monday, May 16, 2011

"Braking" news

Just noticed that Harris is now carrying Kool Stop shoes for rod brakes!
Image off the Harris Website

Salmon koolstop is the widely considered the best wet weather brake compound yet known to man or woman, and they form that orange rubber into all kinds of shapes and sizes to fit all manner of brake apparati.  Until now however they haven't been available for rod brakes, which can use all the braking help that they can get!

This has been on many roadster aficionados wish list for a long time, and I don't know how long they've been available, but I for one am very excited!!!  (I'm such a geek I know).

Tuesday, May 3, 2011

Update on Hub

Harris has decided that they're going to try to offer relubrication service for Shimano Nexus/ Alfine hubs.
They're going to get the kit on Thursday, and test it out with a hub they already have and then hopefully do mine over the weekend if I can get the bike out there before work on Friday morning.   Good thing I've got Minerva mostly up and running -or more importantly stopping, or at least stopping better than before.  But that's another post!

I know that there are an increasing number of people out there with these hubs,  so just wanted to pass the info along.  I'll also report back on how it works after the relubrication and whether it solves the problem.
I looked at the hubstripping place in Seattle that Steve A sent the link for, and it was pretty scary.  I hope that those scarily rusted  hubs they showed "after one year"  were bikes that were living outside.

I do ride through the winter, but I don't actually think my bike gets terribly wet.  I try not to ride in downpours (although I have a handful of times)  and my bike is pampered by living under cover both at work and home.  If this relubrication works out,  I'll probably add it to my yearly service routine- getting a wheel rebuilt with a new hub would really be a killer.

Sunday, September 5, 2010

Bikes in Spaaaaaace

Ok, just on the wall:


After much research, and two trips to the Container Store, I found a wall mounted rack to hang the Lady's Tourist and the Dawn Tourist in a semi- used corner of the basement.   A bike on the ground takes up so much space, that I kept stumbling over the bikes when trying to re-organize all the stuff that's been outside under a tarp during the basement renno.

So, after an hour of drilling holes, there they are.  I lined up the bottoms of the bikes about 6" off the floor, you can see how much longer (almost 1') the Lady's Tourist is than the Dawn.

I also had a mild attack of Shipwright's disease, and decided the change the front brake shoes on the 1938 Lady's Tourist, hereforto known as Agnes (I've been playing with names, and somehow this is the only one that's stuck).  I bought Fibrax pads at Harris, and have spent a fair bit of time messing with Minerva's  pads, so I thought it would be straightforward.

And it was, although not at all like Minerva.  Minerva has a set of stays that clamp onto the fork with a post sticking out.  The brake shoe itself bolts into a carrier, which slides up and down on that post as it's pulled up and down by the stirrup. The post is angled such that when you stop pulling the stirrup, the brakes slide down and away from the rim.
  Agnes has a completely different, and to my eyes, better system.


She has a spring and lever arm that fit onto studs brazed onto the inner face of the fork. The spring and the lever arm are kept concentric with a funny little "bung" or interior washer.  The springs pull the pads away from the rim when you release pressure on the brakes.  I don't know how they compare in effectiveness, but they're a lot easier to deal with when adjusting and replacing the pads.

I think that I've discovered that a 9mm wrench fits these Whitworth bolts well enough to not round them.  Unfortunately I only have a 9mm socket, not a box wrench, so I'm a bit nervous about really cranking on it, without being able to see if I'm rounding it.  I think I need to buy a 9mm wrench (easier than buying a whitworth set -which I've considered, now that I have three rod brake bikes!!)  Fortunately the replacement Fibrax pads are 8mm, so the only thing that is a real problem is the bolt on the rod itself.


Once I had the new pads in, I adjusted them by pushing them hard against the rim with the rod connection loosened, and then tightened the rod connection so that the shoes are "just" clear of the rim when the brakes aren't engaged.  I didn't have time to take it for a test ride, but I noticed that they may be too tight, as when wheeling it across the room, it catches a bit.  Wheel must not be radially true.  But that's a project for another day...

Wednesday, May 19, 2010

Gilbert's basket

Given the dismal forecast, I dressed to get wet this morning in a jean skirt, tights, knit shirt and shell.  The skirt only got wet around the edges, and the tights dried really quickly.
The weather varied from heavy mist to honest to God rain,  but despite that there was a good turnout at the Harvard Bike Breakfast, which had been moved inside the crowded vestibule of the AuBonPain in Harvard square.

There were free blinkie lights,  bike maps, and an assortment of bikers,  most, but not all affiliated with Harvard.  I did learn one new tidbit from a woman who commutes via train from Quincy to South Station, where she keeps a bike to get around the city (I wish I'd got her name!).  She says that they're putting in secure bike cages- weather protected, card accessed in at South Station- kind of like the ones at Alewife, another terminal station.  I think this is a great move, and I hope that the T will work on adding these facilities to all the big terminals and commuter rail- subway interfaces.  I rode part of the way in with an acquaintance from previous bike weeks,  but inline in a bike lane is a lousy way to chat.
 No real pictures from today, but this is the same outfit from a week or so ago.


The big news is that Gilbert's basket arrived from the land of Ebay:


  It's an old trout creel,  with pale wicker and leather banding.  It's very shallow, which is great because that means it doesn't hide his lovely eyes.   (please please don't judge the drunken rear rack- it's a work in progress,  and I need some fabrication time to fix the struts so that it's horizontal..)

 It's more capacious than I thought it might be- plenty of room for a jacket and a camera.  


  It needs a little care- I'll probably bleach, and then shellac the wicker, and give the leather a good oiling.  


 These are just approximations of the mounting,  I'll have to spend more time getting it all attached.  Tonight  I rode home, and dropped off my stuff, then took Gilbert to Harris to get a checkup tomorrow.  I'm having a few small issues with the freewheel,  and want someone with a bit more experience to double check the DIY work on the basic systems to make sure I didn't do something massively wrong.   It was really sad to leave him in the rain (covered with a saddle cover and a piece of plastic sheet)  overnight.   He was supposed to go in yesterday night, but given the forecast of rain today, and Minerva's rainy day braking performance, I decided to postpone it so that I could ride her in the hopefully better weather tomorrow.